

Viewers forgive a slightly soft shot. They scroll past a video with a muddy voice, the wrong music, or no sound at all. Audio is usually the last layer you add to a product video and the first thing people notice.
This guide shows how to use AI audio tools inside KreadoAI to build that layer. AI audio tools are generators and converters that create or transform sound from a text prompt or a recording you upload. KreadoAI has four of them: an AI music generator for songs and background music, an AI sound effect generator for short clips, an AI voice changer for recordings you already have, and AI speech to text for transcripts and SRT subtitles. Each one is a separate tool with its own page. You download the result and place it in your video editor yourself.
Below you'll find what each tool does, when to use it, the exact steps, a real output from each one, and a workflow that ties them together for a marketing video.
Which AI Audio Tool Do You Need?
Start from what you already have. A prompt and no audio points to the generators. A recording points to the voice changer or speech to text.
| You have | You need | Use this KreadoAI tool | You get |
|---|---|---|---|
| A text description of a mood | A song or a background track | AI Music Generator | MP3, WAV, or FLAC |
| A text description of a sound | A whoosh, hit, ambience, or UI sound | AI Sound Effect Generator | MP3 or WAV |
| A recorded voiceover | The same words in another voice | AI Voice Changer | A new audio file |
| An audio file or an MP4 | A transcript and subtitles | AI Speech to Text | Text plus an SRT file |
| A written script | A brand-new voiceover | Text to Speech | A generated voiceover |
The last row is not one of the four audio tools in this guide, but it matters for the workflow later. Text to Speech starts from words you type. The voice changer starts from a voice you recorded.
1. Generate Music for Your Videos with AI Music Generator
The AI music generator creates music from a text prompt. It handles two different jobs, and picking the right one is most of the work.
A song has AI-written lyrics and vocals generated from your description. Background music is an instrumental track that sits under a voiceover, captions, or a product demo. If your ad has someone talking, you almost always want background music. A song with vocals will fight the speaker.
How to generate music
- Open the AI Music Generator and go to Music Generation.
- Choose a model. The menu currently lists Mureka v9.5 (Prompt to Song) for songs, and Lyria 3.5 and Mureka v9.5 (Background Music) for instrumental tracks.
- Describe the track: style, mood, tempo, instruments, and the scene it will sit under. "Soft piano, slow, for a skincare demo, with room for a voiceover" works better than "relaxing music."
- Pick MP3, WAV, or FLAC, then submit.
- Play the result in History. Retry gives you another take from the same prompt. If the direction is wrong, rewrite the prompt instead of retrying.
- Download the take you like and drop it on your timeline.
The generator does not score an uploaded video. You decide where the track starts and how much of it the cut uses.
Here's an instrumental sample from the generator, tagged for product demos: soft, with piano.
Where AI-generated music fits
- Product demos and feature walkthroughs: an instrumental bed keeps the explanation easy to follow.
- Short social ads: match the energy of the cut, bright or calm, then trim the track to the post length.
- Brand films: a song works when the music is the message and nobody is talking over it.
2. Create Custom Sound Effects with AI Sound Effect Generator
The AI sound effect generator turns a text description into a short audio clip. Think of it as the layer that makes motion feel physical: a transition whoosh, a hit under a title, rain behind a quiet shot, a tap on a phone screen.
How to generate a sound effect
- Open the AI Sound Effect Generator and go to Sound Effects.
- Choose a model. The menu currently lists Seed Audio v1.0 Sound Effects and ElevenLabs Sound Effects.
- Describe one sound: what makes it, what it moves through, how close it is, and the mood around it. For example, "Dry glass pump click, very close, for a skincare demo."
- Choose MP3 or WAV, then submit.
- Preview the clip in History, retry for another version, or download it.
One sound per prompt is the rule that saves the most time. When a prompt asks for a whoosh, a hit, and a crowd at once, the result tends to blur. Generate them separately and layer them in the editor.
This is a 15-second product sound from the generator: a drink poured into a glass.
How creators use generated sounds
- Transitions: a soft air whoosh as the shot changes.
- Impacts: a hit under the product name on the end card.
- Ambience: rain on a window or waves on a shore to set a place.
- Product and UI sounds: a cap twist, a pump click, or a tap to confirm an order.
Like the music generator, the sound effect tool does not sync to an uploaded video. You place each clip at the frame where it should land.
3. Change the Voice of an Existing Recording with AI Voice Changer
The AI voice changer takes a recording you already have and returns the same take in another voice. The words and the pauses stay. Only the voice changes.
That makes it different from two tools people often confuse it with. Text to speech starts from a script and generates a new read. Voice cloning creates a reusable voice from a sample, which is a separate step. The voice changer needs a recording first, and it's the right tool when the delivery is already right and you just want a different speaker.
How to change a voice
- Open the AI Voice Changer and upload the audio. Click the upload box or drag the file in.
- Pick the target voice. The picker has two tabs: system voices and cloned voices. Select one and apply it.
- Start the conversion.
- Preview the result, download it, and place the file on your timeline.
A published note allows recordings up to five minutes. If the limit shown on the page is different, follow the page. Split longer files before you upload.
Here's one of the original recordings used on the product page, a short serum voiceover:
And the same take after conversion to a lower, darker voice:
Listen to where the pauses fall. They line up, which is why you can swap the file into an existing edit without re-cutting the picture.
Practical uses
- A second character: one person records both lines, and you change the voice on one of them.
- A consistent series: use the same target voice on every clip so a set of ads keeps one speaker.
- A warmer or clearer read of the same offer, without booking another session.
The voice changer works on saved files only. It is not a live microphone for games, calls, or streams, and it does not imitate a named person.
4. Convert Audio and Video into Text with AI Speech to Text
AI speech to text turns the speech in an audio file or an MP4 into editable text. For an MP4, the tool extracts the audio track first, then transcribes it. It detects the spoken language on its own, shows the original transcript next to a Chinese translation, and lets you export an SRT subtitle file with timestamps.
The transcription model is Gemini 3.5 Transcribe. Google's documentation for that model lists more than 85 languages.
How to transcribe audio or MP4 video
- Open AI Speech to Text. Under local upload, click the upload area or drag in an audio file. You can also upload an MP4.
- Confirm the model is Gemini 3.5 Transcribe and start the transcription. You don't need to pick the language first.
- Review the result. The source transcript sits beside the Chinese translation, line by line.
- Choose what to take away: Copy All, Copy Source Only, Copy Translation Only, or Export SRT.
- Import the SRT into your video editor's subtitle track, or paste the text into your script document.
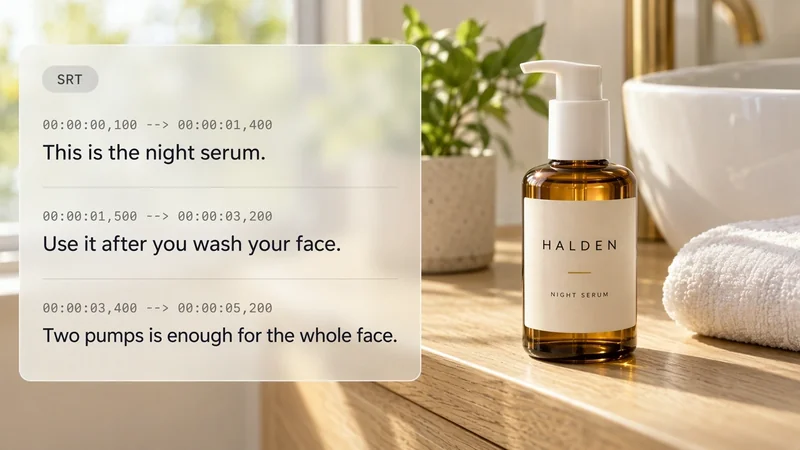
Here is a real example. This 17-second product voiceover:
produced an SRT that starts like this:
1 00:00:00,100 --> 00:00:01,400 This is the night serum.
2 00:00:01,500 --> 00:00:03,200 Use it after you wash your face.
3 00:00:03,400 --> 00:00:05,200 Two pumps is enough for the whole face.
4 00:00:05,400 --> 00:00:07,100 Press it in, then leave it on.
What it does not do
The tool does not burn subtitles into your video. Your original MP4 stays unchanged, and the subtitles come out as a separate SRT file or copied text. It also does not take video links or YouTube URLs; you upload the file. Formats other than audio files and MP4 aren't supported, and the file size limit is shown on the upload page.
5. Generate a Voiceover from a Script with Text to Speech
Text to Speech starts from words you type and returns a new voiceover. Use it when the script is ready and you do not have a recording, or when you rewrote the transcript from the previous step. It is not the voice changer. The voice changer keeps the words and pauses of a take you already recorded. Text to Speech performs the script from scratch, so the delivery is whatever you direct.
How to generate a voiceover with Text to Speech
- Open Text to Speech and paste the script, including product names, in the language the viewer should hear.
- Pick a voice. The picker includes MiniMax Speech-2.8-HD, ElevenLabs Eleven v3, Gemini 3.1 Flash TTS, and Doubao voices. If you made a voice with Voice Clone, you can choose it here too; cloning itself is a separate step.
- Direct the read with emotion tags. Let AI insert them for a first pass, then edit, copy, or delete them by hand.
- Generate the read, preview it, and download the audio. A subtitle file can be generated and downloaded with it.
- Put the voiceover on your timeline, then add music and sound effects from the tools above.
Directing the read with emotion tags
Emotion tags are bracketed cues such as [excited], [happy], [whispers], [laughs], and [pause]. The voice performs them instead of speaking them. For a 15-second serum ad, a tagged script looks like this:
[excited] The night serum is back. [pause] Two pumps after you wash your face. [whispers] Then leave it on.
Keep the tags short and put them where the ad sells: the hook, the proof, the ask. Not every tag fits every voice, and a very soft voice may ignore a tag like [shout]. Preview one tagged line before you generate the full script. For more on the voice models and tags, see our AI voice upgrade overview.
If the delivery of an existing recording is already right and you only want another speaker, stay with the AI Voice Changer. Open Text to Speech when the words changed.
How to Combine KreadoAI Audio Tools in a Video Production Workflow
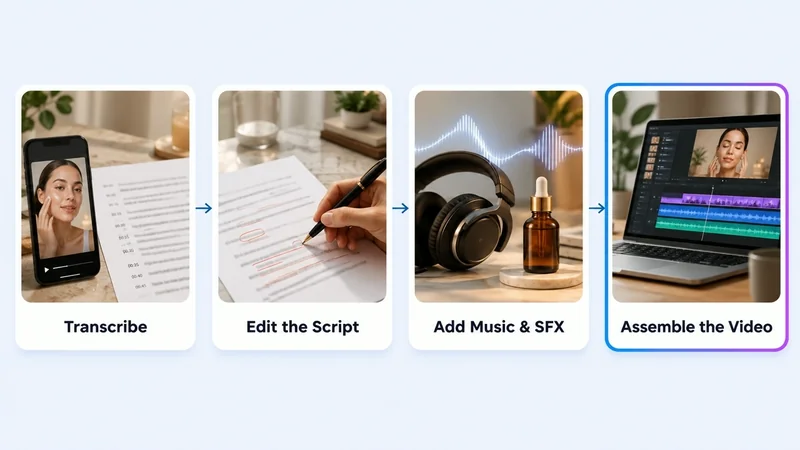
The four tools don't pass files to each other automatically. You move each output by hand, which sounds slower than it is. Here's the order we'd use for a typical 20–30 second product ad that starts from an existing recording.
Step 1: Transcribe the recording you already have
Run the original voiceover or the MP4 through AI Speech to Text. You get the exact words, the timing, and a Chinese translation if you need a localized version. Export the SRT now; you'll want it for subtitles later.
Step 2: Edit the transcript
Copy the source text into your script document. Tighten the hook, cut filler lines, fix product names. This is the cheapest point to change the message.
Step 3: Get the final voiceover
Two paths, depending on what changed. If the words stayed the same and you only want a different speaker, upload the original recording to the AI Voice Changer. If you rewrote the script, generate a new read from the edited text with Text to Speech.
Step 4: Generate background music
Describe a track that leaves room for the voice. Download it in WAV if the final edit needs the larger file.
Step 5: Create sound effects
List the moments that need an accent: the first cut, the product reveal, the end card. Generate one sound per moment.
Step 6: Assemble the final video in your editor
Lay the voiceover first, then music under it, then sound effects at their frames. Import the SRT for subtitles. If you rewrote the script, run the new voiceover through Speech to Text again so the subtitle timing matches the new read.
Common Mistakes When Using AI Audio Tools
- Using a song under a voiceover. Vocals compete with the speaker. Switch to a background music model.
- Putting several sounds in one sound effect prompt. Split them into separate prompts and layer the clips.
- Expecting the voice changer to fix the script. It keeps the words and pauses. Change the script with text to speech instead.
- Uploading a noisy or clipped recording. Both the voice changer and speech to text follow what they can hear. Record a cleaner take when a word is unclear.
- Treating the SRT as burned-in captions. It's a separate subtitle file. Import it into your editor or upload it with the video where the platform accepts it.
- Reusing the old SRT after a new voiceover. The timing came from the old read. Transcribe the new file.
Frequently Asked Questions
What are KreadoAI's AI audio tools?
They are four separate tools: an AI music generator, an AI sound effect generator, an AI voice changer, and AI speech to text. The two generators create audio from text prompts. The voice changer and speech to text work on recordings you upload.
How do I generate AI music?
Open the AI Music Generator, choose a song model or a background music model, describe the style, mood, tempo, and scene, pick MP3, WAV, or FLAC, and submit. Preview the track in History, then download it.
Can I create sound effects from text?
Yes. Describe one sound, such as a whoosh, an impact, ambience, or a product click, choose MP3 or WAV, and generate. You can retry for another version from the same prompt.
Can I change the voice of an existing recording?
Yes. Upload the recording to the AI Voice Changer, pick a system voice or a cloned voice, and convert it. The words and pauses stay the same, and you download a new audio file.
Can I transcribe audio and video into text?
Yes, for audio files and MP4 videos. AI Speech to Text detects the language, shows the source transcript with a Chinese translation, and lets you copy the text or export an SRT file. Video links are not supported.
What is the difference between speech to text and text to speech?
Speech to text starts from a recording and gives you text and subtitles. Text to speech starts from a script and gives you a new voiceover. They often appear in the same project, one after the other.
Which audio tool should I use for my video?
Use the music generator for a soundtrack, the sound effect generator for short accents and ambience, the voice changer when you have a good recording but want another voice, and speech to text when you need the words or subtitles from a recording.
Conclusion
Each KreadoAI audio tool covers one stage of a video's sound. Speech to text gets the words and subtitles out of a recording, the voice changer swaps the speaker, and the music and sound effect generators fill in what sits under and around the voice. You run them one at a time and finish the mix in your own editor. If you want the product-side story of these tools, read what's new in KreadoAI's audio tools.